![]()
![]()
![]()
![]()
![]()
![]()
![]()
This chapter provides an overview of Korean input methods. It describes:
![]()
![]()
![]()
![]()
![]()
![]()
![]()
For character-cell terminal applications, Korean input methods are implemented via the VT382-K Korean terminal firmware or are incorporated in the terminal emulation software, such as Hangul DECterm. Applications need not provide software to handle the input of Korean characters; the VT382-K terminal or Hangul DECterm provides the input method services.
Hangul DECterm can be regarded as a DECwindows Motif application and is activated and deactivated using the same methods as similar applications. See Section 7.1.2 for more information.
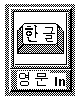
If you have a VT382-K terminal, select input mode by using the [Compose] key, which is located on the lower left side of the main keyboard. On the Korean version of the LK201 or LK401 keyboard (that is, LK201-K or LK401-K), the [Compose] key is labeled 한글. For details, see Chapter 6.
After you activate Korean input mode, the VT382-K terminal firmware or the input methods incorporated in Hangul DECterm compose Korean characters and return the input data as appropriate.
![]()
![]()
![]()
![]()
![]()
![]()
![]()
DECwindows Motif applications implement Korean input methods using an independent process called the input server. The Korean input server is an X client process that works on a standard X-server provided the required Korean fonts are installed. This means that the Korean input server can run on any system which can access your X display device, including the device itself.
The Korean input server provided by the Compaq Tru64 UNIX operating system is interoperable with all existing DECwindows Motif /Hangul platforms, including VMS DECwindows Motif /Hangul and UWS/Hangul. In addition, it can provide input method services to the R6 X library (Xlib) supported by the Compaq Tru64 UNIX operating system. You can write internationalized applications using the standard R6 application programming interface and communicate with this input server. For details about developing internationalized software with X11R6, see Writing Software for the International Market.
Before you can input Korean data, you must start the Korean input server on your workstation or any system that your workstation can access through the network. This release provides English and Korean interfaces to the input server. Make sure you have set up the correct session language before starting the input server. There are several ways to start the Korean input server:
After logging in to a session, you can start the Korean input server by selecting "Hangul IM" from the Applications menu of the Session Manager, just like starting any DECwindows application.
If you start your session in a Korean locale, by default, the menu item "Hangul IM" is added to the Session Manager's Automatic Startup list. When you log in, the input server starts automatically. If you do not want to automatically start the input server, you can remove this item from the Automatic Startup list by using the Session Manager's Customize menu.
Note
Applications that are started before Hangul IM cannot connect to the input server. Therefore, Hangul IM should be the first item on the Automatic Startup list.
To start the input server on the workstation you are using, enter the following command:
% /usr/bin/X11/dxhangulim &
To start the input server on a remote system, enter the following command on that system:
% setenv DISPLAY <display-name>
% /usr/bin/X11/dxhangulim &
In the <display-name> field enter the display name for your workstation.
After you invoke the Korean input server, the DECwindows Motif applications that were internationalized to support Korean can communicate with the server for input method services.
![]()
![]()
![]()
![]()
![]()
![]()
![]()
Common Desktop Environment (CDE) applications, implement Korean input methods using an input server. Before you can input Korean data, you must start the Korean input server. There are two ways to start the Korean input servers in CDE:
If Korean language is selected on the CDE login menu, the Korean input server automatically starts. The following script runs automatically when you log in:
/usr/dt/config/Xsession.d/0020.dtims
The value of the DTSTARTIMS environment variable determines whether the specified Korean input server starts automatically.
To start the input server on the workstation you are using, enter the following command:
% /usr/bin/X11/dxhangulim &
To start the input server on a remote system, enter the following command on that system:
% setenv DISPLAY <display-name>
% /usr/bin/X11/dxhangulim &
In the <display-name> field enter the display name for your workstation.
After you invoke the Korean input server, the DECwindows Motif applications that were internationalized to support Korean can communicate with the server for input method services.
![]()
![]()
![]()
![]()
![]()
![]()
![]()
You can select the Korean input mode using the key sequences shown in Table 7-1.
Input Method |
VT382-K |
LK201 |
DECwindows Motif LK401 |
PC Keyboards |
|---|---|---|---|---|
Hangul |
[Compose] |
[Compose/Space] |
[Compose] |
[Shift/Space] |
Hanja |
[Shift/Compose] |
[Shift/Compose/Space] |
[Shift/Compose] |
[Ctrl/Space] |
Row-Column |
[Ctrl/Compose] |
[Ctrl/Compose/Space] |
[Ctrl/Compose] |
[Ctrl/Shift/Space] |
Phrase |
- |
[F6] |
[F6] |
[F6] |
Note
These key sequences can be customized through the Options menu provided by the input server.
![]()
![]()
![]()
![]()
![]()
![]()
![]()
You can interact with the Korean input server through a Motif-style user interface that allows an input method to provide feedback about the data being edited. This feedback helps you compose a character, list choices for selection, provide options for customizing the input server, and so on.
![]()
![]()
![]()
![]()
![]()
![]()
![]()
The X Input Method specification defines the three input areas described in Table 7-2.
Area |
Description |
|---|---|
Auxiliary area |
An option menu helps you customize the Korean input methods and the input method window. |
Status area |
This area displays the internal state of the Korean input method that is critical to you. |
Pre-edit area |
This area displays the intermediate text that is being composed. This area also provides a lookup region to display a list of valid candidates for the input key sequences. |
![]()
![]()
![]()
![]()
![]()
![]()
![]()
The use of the input areas depends on the interaction style (or pre-edit style) selected for the application. The Korean input server supports four interaction styles:
![]()
![]()
![]()
![]()
![]()
![]()
![]()
If you want to display the pre-edit data in a separate input window which lies outside the application window, choose the root window interaction style. The input window is scalable and movable; you can modify its size and position to meet your preferences. If you want to free up more screen space, you can iconize the input method window. You can also choose to display pre-edited data in vertical or horizontal layout. Figure 7-1 shows an example of root window interaction style.
If you are an experienced user, you may not need to perform input by looking at the preedit area. In this case, you can iconize the input window to improve performance. See Figure 7-2.
When the input window is iconized, you can continue to input Korean characters through a Korean application window. To let you know the input status, the input state is displayed on the icon title which is updated according to the input mode and the input focus. If you want to see the pre-edit data, you can double click on the icon to display the input window.
![]()
![]()
![]()
![]()
![]()
![]()
![]()
If you want to display the pre-edit data in a fixed location of the application window, you can choose the off-the-spot interaction style. When you choose this interaction style, the Korean input server creates the input window at the bottom of the application window. You no longer need to refer to the root window; you can iconize it to save screen area. Figure 7-3 shows an example of off-the-spot interaction style.

![]()
![]()
![]()
![]()
![]()
![]()
![]()
If you want to focus your attention at the point of insertion during Korean data input, you can choose the on-the-spot interaction style. In this style, the Korean input server directs your applications to display the pre-edit data in a way which is consistent with the appearance of the existing data in the input field. For instance, an application can select the font size and typeface to display the pre-edit data and control how the data is highlighted. You can also format existing data to allow the pre-edit data to be displayed at the insertion point. Figure 7-4 shows an example of on-the-spot interaction style.
![]()
![]()
![]()
![]()
![]()
![]()
![]()
Another alternative which allows you to perform Korean data input at the point of insertion is the off-the-spot interaction style. In this style, an input window is created when you invoke the Korean input mode; the window is placed over the current point of insertion. The pre-edit data entered is displayed in this window. The look and feel is similar to that of the on-the-spot style, except that applications do not control the display attributes of the pre-edit data and no formatting is performed to accommodate the pre-edit. Therefore, there is less communication overhead between the Korean input server and the applications. The performance of data entry through the over-the-spot interaction style is better. Figure 7-5 shows an example of over-the-spot interaction style.
The VendorShell resource XmNPreeditType lets you specify the priority of the interaction styles of DECwindows Motif applications. By default, the resource value is "overthespot,offthespot,root,onthespot", in priority order. The first style is used if available in an input method, else the second, and so on.
To choose your preferred interaction style, you can either:
% dxcardfiler -xrm '*preeditType: root' &
To start Cardfiler with the off-the-spot interactive style, you can enter:
% dxcardfiler -xrm '*preeditType: offthespot' &
To start Cardfiler with the on-the-spot interactive style, you can enter:
% dxcardfiler -xrm '*preeditType: onthespot' &
- From the Session Manager's Options menu, select Input Method...
- In the popup Input Style Options window, click on one of the pre-edit styles
The XmNpreeditType resource is then set to a priority list beginning with the pre-edit style that you chose.
After you choose your preferred interaction style, the applications you invoke start up with the new setting.
Note
Some applications, such as DECterm, may provide their own user interface to handle interaction styles. Those mechanisms may override the methods described here.
![]()
![]()
![]()
![]()
![]()
![]()
![]()
When you start the Korean input server, no application is connected to it and the string "No Connection" is displayed in the title bar to indicate the state. When an internationalized application is started in a Korean locale and becomes focused, the string 영문 is displayed in the status area, indicating that the application is connected to the Korean input server and the input mode is English. If you invoke a Korean input method, the input state displayed in the status area and the title bar is updated accordingly. If you change the input focus to a noninternationalized application window, the title of the input window changes to "No Connection" again.
The input server can maintain individual states of composing for different input contexts or application windows. In addition, under the root window interaction style, each application window can be associated with its own attributes, such as font size, font style, line spacing and foreground/background colors. You can set the input focus to an application window and then compose a Korean character or customize the input window in the way that you prefer. The input server can memorize the composing state and input your window attributes. The next time this application window gets the input focus, the input server can restore the original composing state and attributes. Also, the input window rises to the top to get your attention.
![]()
![]()
![]()
![]()
![]()
![]()
![]()
The auxiliary area of the input window provides an options menu where you can customize the input server. You can click the [ ] (Options) button to view the customization pulldown menu. The menu provides the following options:
![]()
![]()
![]()
![]()
![]()
![]()
![]()
You can choose this option only if the current layout is horizontal. When you choose this option, the input window and the layout of its contexts display in a vertical manner. The vertical input window remains at the same origin.
![]()
![]()
![]()
![]()
![]()
![]()
![]()
You can choose this option only if the current layout is vertical. When you choose this option, the input window and the layout of its context display in a horizontal manner. The horizontal input window remains at the same origin.
![]()
![]()
![]()
![]()
![]()
![]()
![]()
This option is provided for customizing the phrase input mode. In this release, DECwindows Motif shares the same phrase databases created and managed by the Compaq Tru64 UNIX operating system Phrase Utility. Once you have created a phrase database and defined your phrase definitions, both character-cell terminal applications and DECwindows Motif applications can use the data for phrase input. To use the phrase databases, the LANG environment variable must be set to reflect the required codeset, that is, ko_KR.deckorean. For details about the Phrase Utility and phrase definition file, see WrIting Software for the International Market.
The Select Phrase Input Class option allows you to focus on a particular class of phrases during phrase input. When you choose this option, a dialog box pops up and you can choose the phrase class that you want to use.
If you want to choose all classes, enter the "*" option. If you do this, the phrase input method searches all classes of phrase definitions for the phrase code that you have entered. When there are multiple phrases that match the phrase definition, a list box pops up. You can choose the right phrase definition by double clicking on the item in the list box.
![]()
![]()
![]()
![]()
![]()
![]()
![]()
The Phrase Input method allows you to access two phrase definition databases: the system phrase database and the user phrase database. You create and maintain your own private phrase database for storing your frequently used phrases. This is called the user phrase database.
For details about creating phrase database, see Writing Software for the International Market.
If you choose the user phrase database option, your private user phrase database is used.
![]()
![]()
![]()
![]()
![]()
![]()
![]()
The system phrase database is for public access by all users using your system. It should be created and modified by your system administrator. If you choose the system phrase database option, the system phrase database is used.
Note
The databases that you can access are the ones available on the system on which you start your Korean input server.
![]()
![]()
![]()
![]()
![]()
![]()
![]()
You can associate an application window with a set of input window attributes. This option allows you to customize the attributes of a specific application window.
When you choose the current window option, a dialog box pops up and the following options are displayed:Note
This option is available only if you have selected root window as your interaction style and you have focused to an internationalized application input area. Otherwise, this option dims out. If you choose to use the off-the-spot, over-the-spot, or on-the-spot interaction style, the application determines these attributes.
This option allows you to choose the font size used to display pre-edit data. You may choose to use either big font or small font by clicking on one of the following toggle buttons:
- 큰 폰트 (Big Font)
- 작은 폰트 (Small Font)
Choosing Big Font results in a bigger input window, which occupies more screen space.
This option allows you to choose the font typeface to be used in the input window. Three typeface options are provided: Gotic, Myungcho or Screen.
To choose the font typeface, click on one of the following toggle buttons:
- 고딕 (Gotic)
- 명조 (MyungCho)
- 화면 (Screen)
If you want to choose a typeface that is not on the options list, you can define it in the Korean input server resource file. This option will be shown beside the 기타 (Other):, label in the customization window.
The Korean input server can display pre-edit data on multiple text lines. This may happen when a list of candidates is displayed for your selection. The Line Spacing option lets you adjust the spacing between these text lines. To adjust the line spacing, drag the Line Spacing slider (labeled as 행 띄기) or move the pointer to the desired position on the slider and click MB1.
This option allows you to customize the foreground and background colors of the input window.
For monochrome display, the following options are provided:
- 흰바탕에 검은색 (Dark Text, Light Background)
- 검은바탕에 흰색 (Light Text, Dark Background)
For color display, you can choose from a palette of colors to design a visually pleasing input window. To customize the foreground or background color, you should first select the color that you want to change by clicking one of the following toggle buttons:
- 전경색 색상 (Input Window Foreground Color)
- 배경색 색상 (Input Window Background Color)
A color mixing window pops up on top of the customization window. You can then mix the color using the three sliders which represent the intensities of the primary colors. The modified color is displayed on the right-half of the color box while the left-half shows you the original color.
![]()
![]()
![]()
![]()
![]()
![]()
![]()
There are several customizable attributes which globally apply to all input windows. In the Korean input server, they are:
When you make an error during the composition of Korean characters, the bell rings to alert you. You can adjust the bell volume by dragging the Bell Volume slider (labeled as 벨 음량) or by moving the pointer to a desired position on the slider and clicking MB1.
By default, the key sequences for invoking Korean input methods are predefined. You can change these default key sequences to meet your preference or working style. This option allows you to customize the following key sequences:
- Start Hangul Input Method (한글 입력 시작)
- End Hangul Input Method (한글 입력 종료)
- Start Hanja Conversion (한자 변환 시작)
- Start Row-column Conversion (행렬 변환 시 작)
- Start Phrase Input (구문 입력 시작)
- End Phrase Input (구문 입력 종료)
The bottom part of the dialog box provides an interface that you can use to customize a key sequence. It allows you to select a trigger key and to toggle the on/off state of the Ctrl, Alt and Shift modifiers. The trigger keys that you can choose include NoSymbol, [F1] - [F20], [Space], [Return], [Compose] and [A] through [Z]. If you choose NoSymbol, no invocation sequence is provided for the selected action.
For each modifier key, you can select the on/off state with the toggle buttons identified in Table 7-3.
Modifier |
On State |
Off State |
|---|---|---|
Ctrl |
"Ctrl" |
"~Ctrl" |
Shift |
"Shift" |
"~Shift" |
Alt |
"Alt" |
"~Alt" |
The tilde (~) sign means that you should not press that modifier key when invoking the action. In addition to the on/off state, you can deselect both of the states for a modifier key, that is, neither state is selected. To do this, click the toggle button that is currently set on. If you deselected a modifier, the invocation key with or without holding the modifier key can be accepted by the input server.
When one of the invocation key sequences is selected, for example the 한글 입력 종료 (End Input Method) key sequence, the state of the toggle switches and the trigger key displayed at the bottom of the dialog box is updated to reflect the current value. The label at the bottom left-hand side of the window is changed to 한글 입력 종료. Figure 7-6 shows an example of customized invocation key sequences.
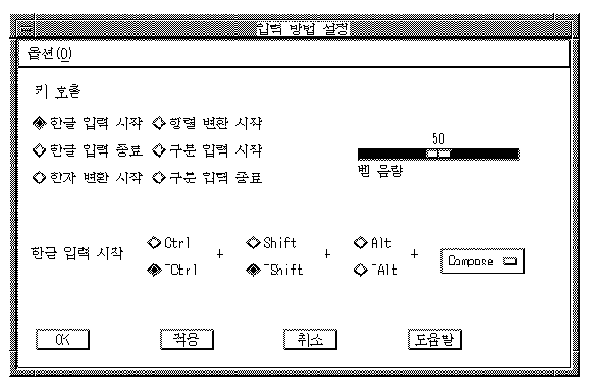
If you want to change the End Input Method key sequence to [Ctrl/Space], select the Ctrl, ~Alt, and ~Shift buttons.
![]()
![]()
![]()
![]()
![]()
![]()
![]()
This option provides online information about the Korean input server.
![]()
![]()
![]()
![]()
![]()
![]()
![]()
You can use this option to terminate the input server. If you choose this option, a dialog box pops up to confirm that you really want to exit.
![]()
![]()
![]()
![]()
![]()
![]()
![]()
All attributes which can be customized with 현재 창 (Current Window) and 입력 방법 설정 (Input Method Customization) can be saved into a resource file. You can choose to save the current settings into a private resource file in your login directory. To reset or save the current settings, you can choose the options shown in Table 7-4 inside each customization window.
Function |
Description |
|---|---|
시스템 기본값 복원 (Restore system setting) |
Restores all system default attributes |
설정 사항을 기본값으로 저장 (Save Settings as Defaults) |
Saves all current attributes as default values. These attributes are saved to a private resource file .DXHangulim in your login directory. |
![]()
![]()
![]()
![]()
![]()
![]()
![]()
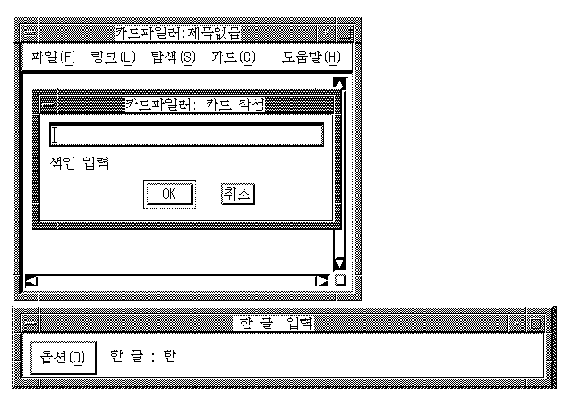
Hangul characters are the most commonly used characters in Korea today. Each Hangul character represents one syllable. It is made up of a number of phonetic symbols called "Jamo". There are altogether 22 Jamos for composing Hangul characters and they can be entered through the keys on the main keyboard, as illustrated in Chapter 6.
The input sequence of Jamos should follow that of the pronounced syllables. The first Jamo input should always be a consonant. To enter a Hangul character, invoke the Hangul input method by pressing the respective key sequence and then enter the phonemes of the desired Hangul character.
For example, the string 한글 can be input using the Hangul method as follows:
Hangul Character |
Key Sequence |
Composition |
|---|---|---|
한 |
[G],[K],[S] |
ㅎ,하,한 |
글 |
[R],[M],[F] |
ㄱ,그,글 |
To enter these characters, invoke the Hangul input method and then press [G] to enter the element ㅎfor 한.
$ ㅎ
한 글
When you press [K] to enter the element ㅏ, the element is composed with ㅎ to form 하.
$ 하
한 글
When you press [S] to enter the element ㄴ, the element is composed with 하 to form 한.
$ 한
한 글
To enter 글, press the elements [R], [M], [F].
$ 한글
한 글
![]()
![]()
![]()
![]()
![]()
![]()
![]()
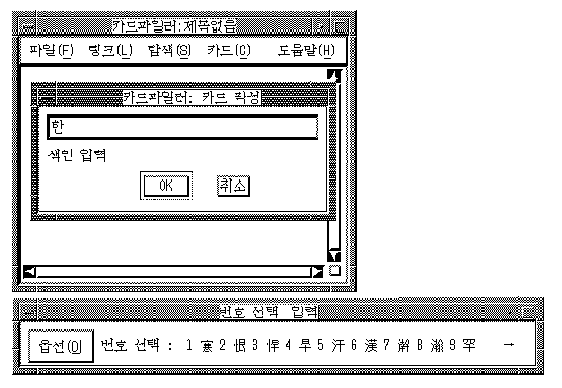
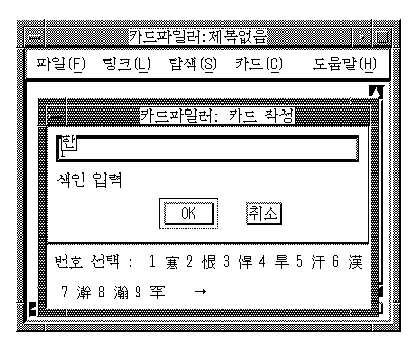
The word "Hanja" is equivalent to "Chinese Character". To enter Hanja, you should first enter the corresponding Hangul characters which represent their pronunciation and then convert them to Hanja.
To enter a Hanja, invoke the Hangul input method and enter the Hangul character that represents its pronunciation. Before sending the character to the application, press the respective key sequence to invoke the Hanja input method. A list of Hanja corresponding to the pronunciation is displayed in the pre-edit area for selection. To select the desired character, press the numeric key associated with the character on the main keyboard.
For example, the string 韓國 can be input using the Hanja input method as follows:
Hanja |
Pronunciation |
Key Sequence |
Composition |
|---|---|---|---|
韓 |
한 |
[G],[K],[S] |
ㅎ, 하, 한 |
國 |
극 |
[R],[N],[R] |
ㄱ, 구, 국 |
To enter the Hanja 韓, invoke the Hangul input method and enter the corresponding Hangul 한 by pressing [G], [K], [S].
$ 한
한 글
Then, invoke the Hanja mode:
$ 한
번호 선택 1.寒 2.恨 3.悍 4.旱 5.汗 6.漢 7.澣 8.瀚 9.罕 →
The right arrow sign (→) indicates that more candidates are available for selection. To view the candidates on the next row, press [Space] or the right arrow key.
$ 한
번호 선택 1.翰 2.閑 3.閒 4.限 5.韓
To move backward, press [Shift/Space] or the left arrow key (¬).
To select the character you want, press the numeric key associated with the character. In this example, while displaying the second group of candidates, press [5].
$ 韓
한 글
Similarly, you can press [R], [N], [R] to compose 국 and then invoke the Hanja input method to convert 국 to 國.
After you complete the input of a character, the Hanja input mode exits and returns to the original input mode.
![]()
![]()
![]()
![]()
![]()
![]()
![]()
As described in Chapter 1, each character in the KSC5601-1992 character set is assigned a position in the character plane and can be uniquely identified by this position. You can enter Korean characters by specifying the row number and the column number of the desired character.
When the row-column mode is invoked, the following message is displayed on the pre-edit area.
행렬코드 입력 : _
When you enter the row-column code, the input data is echoed in the pre-edit area. Only the numeric keys are valid for the row-column input method.
행렬코드 입력 : 0264_
The data can be in the following formats where XX is the row number and YY is the column number:
Types of format |
Format |
Example |
Remark |
|---|---|---|---|
4 Digit |
XXYY |
0263 |
KS Code |
5 Digit |
0XXYY |
00263 |
KS Code |
5 Digit |
1XXYY |
10263 |
DEC Extension |
The Korean character is sent to the application after you enter a valid four-digit or five-digit code and press [Return] or [Enter].
For example, the row-column code of 한 is 3949. To enter this character using the row-column input method, invoke the input method, then press [3] [9] [4] [9] and [Return].
$
핸련 코드 입력:
Alternatively, if you enter a two-digit row number and then press [Enter] or [Return], a list of characters assigned to that row is displayed. You can choose the character that you want from the list of candidates.
![]()
![]()
![]()
![]()
![]()
![]()
![]()
The phrase input method is designed to facilitate the input of frequently used phrases. You can prepare your own database of frequently used phrases, with each phrase being identified by a phrase code. To input a phrase, enter its phrase code and then convert it to the respective phrase.
The Compaq Tru64 UNIX operating system provides a Phrase Utility that you use to create phrase databases. The Korean input server can directly access the phrase databases. In addition, you can choose the phrase database being used.
When you invoke the Phrase input method, the string "PHRASE:" is displayed in the status area. Then you can enter the phrase by specifying the phrase code, for example:
$ PHRASE:KOREA
If the phrase code has corresponding data in the phrase definition database, the data is sent to the application as shown below:
$ 韓國
PHRASE:
To correct the phrase code while pre-editing, press the [Delete] key and re-enter the correct code.
The phrase code can consist of at most 8 English alphanumeric characters. The first character must be an English alphabet character. The remainder can be alphanumeric. If it has less than 8 characters, press [Return] or [Space] to signal the end of input. If it has exactly 8 characters, the respective phrase is automatically sent. You do not have to press [Return] after entering the last character.
For more information on creating phrase databases, see Writing Software for the International Market and the phrase(1) reference page.
![]()
![]()
![]()
![]()
![]()
![]()
![]()