This chapter describes how to use the
asemgr
utility to manage the services in an available server environment
(ASE).
Specifically, you can perform the following tasks with the
asemgr
utility:
Display service status (Section 10.1)
Display the contents of a single ASE service or an entire ASE database (Section 10.2)
Place a service off line (Section 10.3)
Restart unassigned services (Section 10.4)
Manually relocate a service to a specific member system (Section 10.5)
Modify services (Section 10.6)
Delete services (Section 10.7)
Rereserve a Logical Storage Manager (LSM) device (Section 10.8)
To display the status of available server environment (ASE) services, choose the "Display the status of a service" item from either the Managing ASE Services menu or the Obtaining ASE Status menu. Service status information includes the following:
Type of service, either distributed raw disk (DRD), Network File System (NFS), disk, tape, or user-defined
Service name
Member on which the service is running or off line if the service is off line
Automatic Service Placement (ASP) policy
Disk configuration that the service uses
Example 10-1
shows how to display the status of the NFS
service named
ase4.
		Managing ASE Services

    c)  Service Configuration
-->
    r)  Relocate a service
   on)  Set a service on line
  off)  Set a service off line
  res)  Restart a service
    s)  Display the status of a service
    a)  Advanced Utilities
-->

    x)  Exit to the Main Menu            ?)  Help

Enter your choice [x]: s


        Service Status

Select the service whose status you want to display:

    1)  ase4 on toto
    2)  aseba2 on daffy
    3)  disk1  on gideon

    x)  Exit                             ?)  Help

Enter your choice [x]: 1

        Status for NFS service `ase4`

 Status:      Relocate:    Placement Policy:    Favored Member(s):
 on toto      yes          Balance services     None

        Storage Configuration for NFS service `ase4`

NFS Exports list
 /nfstest tregtest

Mount Table (device, mount point, type, options)
 treg#fset1 /var/ase/mnt/ase4/nfstest advfs rw

Advfs Configuration
 Domain:          Volume(s):
 treg             /dev/vol/dg3/vol01
LSM Configuration
 Disk Group:      Device(s):
 dg3              rz19g rz27g
You can obtain the full contents of the available server environment
(ASE) database (/var/ase/asecdb) from disk in ASCII format
by selecting the "Display the configuration of the ASE database" item from
the Managing the ASE menu of the
asemgr
utility.
Similarly,
you can obtain the contents of the database for any given service by selecting
the "Display the configuration of a service" item from the "Service Configuration"
item of the Managing ASE Services menu.
Inspecting the contents of the ASE database can be helpful when you are staging a new ASE service, verifying the specific details of a service, or debugging unexpected service behavior. Because the format of the database output is in ASCII format, and tokens delimit the start and end of each action script, you can write scripts (such as a service monitor) that process it.
The
asemgr
command provides command-line flags that
also allow you to dump ASE database contents.
To display the information for
a single ASE service, use the following command-line syntax:
asemgr -d -c
[service ]
To display the information for the current ASE database, use the following syntax:
asemgr -d -C
By default, the
asemgr
utility dumps the contents
of the ASE database from the
/var/ase/config/asecdb
file.
To display the information in a specific ASE database (for example, a saved
version), use the following syntax:
asemgr -d -C /var/ase/config/asecdb.backup
The ASE database on disk (rather
than the one in memory) is read by these commands.
The output from these
commands can be read by a shell or
awk
script and parsed
into actions, depending on the data.
For example, to dump the description of the
drd1
service, enter the following command:
# asemgr -d -c drd1

!! ---------------------------------------------------------------------------
!! ASE service configuration for drd1
!! ---------------------------------------------------------------------------

@startService drd1
Service name: drd1
Service type: DRD
Relocate on boot of favored member: yes
Placement policy: balanced

DRD Device Special File:    /dev/rdrd/drd1
Underlying Storage:         /dev/rvol/dg1/vol01
LSM disk group: dg1
  dg1 disks: rz10 rz9
@endService drd1
The following is an example of the type of information displayed when
you enter an
asemgr -d -C
command or select the "Display
the configuration of the ASE database" item from the Managing the ASE menu.
Callout numbers refer to the descriptions listed after the example.
                Managing the ASE

    a)  Add a member
    d)  Delete a member
    n)  Modify the network configuration
    m)  Display the status of the members
    C)  Display the configuration of the ASE database
    l)  Set the logging level
    e)  Edit the error alert script
    t)  Test the error alert script
     )  Enable ASE V1.5 functionality

    q)  Quit (back to the Main Menu)
    x)  Exit                             ?)  Help

Enter your choice [q]: C

!! ---------------------------------------------------------------------------
!!  ASE database /var/ase/config/asecdb
!! --------------------------------------------------------------------------- [1]

ASE functionality version: V1.5 [2]
ASE logging level: Notice [3]
Number of ASE members: 2 [4]
Primary network default retry settings: (see /etc/hsm.conf for overrides) [5]
  Primary network max retries: 4 [6]
  Primary network time between retries: 10 [7]
  Primary network time between successes: 30 [8]
  Primary network time between failures: 50 [9]
Backup network default retry settings: (see /etc/hsm.conf for overrides) [10]
  Backup network max retries: 4
  Backup network time between retries: 10
  Backup network time between successes: 300
  Backup network time between failures: 300
AM default retry settings: (see /etc/hsm.conf for overrides) [11]
  AM max retries: 2
  AM time between retries: NA
  AM time between successes: 20
  AM time between failures: 300
Network interface default retry settings: (see /etc/hsm.conf for overrides) [12]
  Network interface max retries: 4
  Network interface time between retries: 10
  Network interface time between successes: 30
  Network interface time between failures: 50

!! ---------------------------------------------------------------------------
!! ASE database information
!! ---------------------------------------------------------------------------

ASE database format: V1.5 [13]
ASE database created by product: TruCluster Production Server [14]
ASE database created by member: lildogrm [15]
ASE database timestamp version: 870356729 [16]
ASE database last updated on: Thu Jul 31 09:45:29 1997 [17]
ASE database last updated by: lildogrm [18]
ASE database revision number: 16 [19]

!! ---------------------------------------------------------------------------
!! ASE network interface configuration
!! ---------------------------------------------------------------------------

Member name: lildogrm [20]
  Member IP address: 10.0.0.2 [21]
  Daemon communication use: Primary [22]
  Member aliveness ping use: Primary [23]
  Monitor interface setting: ignore [24]
Member name: lilcatrm [20]
  Member IP address: 10.0.0.1 [21]
  Daemon communication use: Primary [22]
  Member aliveness ping use: Primary [23]
  Monitor interface setting: ignore [24]

!! ---------------------------------------------------------------------------
!! ASE alert script information [25]
!! ---------------------------------------------------------------------------

System alert script name: /var/ase/sbin/ase_run_sh [26]
System alert script timeout: 20 [27]

@startText alert_script_0 [28]
# *****************************************************************
# *                                                               *
# *    Copyright (c) Digital Equipment Corporation, 1991, 1997    *
# *                                                               *
# *   All Rights Reserved.  Unpublished rights  reserved  under   *
# *   the copyright laws of the United States.                    *
# *                                                               *
# *   The software contained on this media  is  proprietary  to   *
# *   and  embodies  the  confidential  technology  of  Digital   *
# *   Equipment Corporation.  Possession, use,  duplication  or   *
# *   dissemination of the software and media is authorized only  *
# *   pursuant to a valid written license from Digital Equipment  *
# *   Corporation.                                                *
# *                                                               *
# *   RESTRICTED RIGHTS LEGEND   Use, duplication, or disclosure  *
# *   by the U.S. Government is subject to restrictions  as  set  *
# *   forth in Subparagraph (c)(1)(ii)  of  DFARS  252.227-7013,  *
# *   or  in  FAR 52.227-19, as applicable.                       *
# *                                                               *
# *****************************************************************
# @(#)$RCSfile: ase_logcrit_sh.sh,v $ $Revision: 1.2.5.3 $ (DEC)
# $Date: 1996/06/26 21:19:55 $

ADMIN="root"

PATH=/sbin:/usr/sbin:/usr/bin
export PATH

TIME=`date +"%D %T"`

ERR_FILE=/var/ase/tmp/alertMsg
HSM_STATUS=`awk -F: '{print $2}' ${ERR_FILE} | sed 's/ //g'`

case    "${HSM_STATUS}" in
                HSM_PATH_STATUS)
                        awk -f /var/ase/lib/path_status_awk ${ERR_FILE}
                        ;;
                HSM_NI_STATUS)
                        awk -f /var/ase/lib/ni_status_awk ${ERR_FILE}
                        ;;
esac

if [ -n "${ADMIN}" ]; then
      if [ ! -f "${ERR_FILE}" ]; then
        echo "Critical ASE error or status change detected on `date`" > ${ERR_FILE}
      fi

        mailx -s "***Critical ASE error or status change - ${TIME}" ${ADMIN} < ${ERR_FILE}
fi

rm -f ${ERR_FILE}


@endText alert_script_0 [29]


!! ---------------------------------------------------------------------------
!! ASE service configuration for drd_service_1
!! ---------------------------------------------------------------------------

@startService drd_service_1 [30]
Service name: drd_service_1 [31]
Service type: DRD [32]
Relocate on boot of favored member: yes [33]
Placement policy: favored [34]
Favored member(s): milesd[35]
DRD Device Special File:    /dev/rdrd/drd1 [36]
Underlying Storage:         /dev/rrz19c [37]
@endService drd_service_1 [38]


!! ---------------------------------------------------------------------------
!! ASE service configuration for disk_service_1
!! ---------------------------------------------------------------------------

@startService disk_service_1 [30]
Service name: disk_service_1 [31]
Service type: DISK [32]
Relocate on boot of favored member: yes [33]
Placement policy: favored [34]
Favored member(s):  milesd[35]
Device: /dev/rz20c [39]
  /dev/rz20c mount point: NONE/dev/rdrd/drd1
@endService disk_service_1 [38]


!! ---------------------------------------------------------------------------
!! ASE service configuration for aseqa236
!! ---------------------------------------------------------------------------

@startService aseqa236 [30]
Service name: aseqa236 [31]
Service type: NFS [32]
Relocate on boot of favored member: yes [33]
Placement policy: favored [34]
Favored member(s): [35]
NFS locking file: /var/ase/mnt/aseqa236/ase/aseqa236/.ase/nfs_lock [40]
IP address: 16.141.112.236 [41]
Device: dom1#set1 [39]
  dom1#set1 mount point: /var/ase/mnt/aseqa236/ase/aseqa236
  dom1#set1 filesystem type: advfs
  dom1#set1 mount options: rw
  dom1#set1 mount point mode: 777
AdvFS domain: dom1
  dom1 volumes: /dev/vol/dg1/vol01
LSM disk group: dg1
  dg1 disks: rz10 rz9

!! ---------------------------------------------------------------------------
!! NFS exports list for aseqa236
!! ---------------------------------------------------------------------------

@startText aseqa236_NFS_exports [42]
 /ase/aseqa236 [43]
@endText aseqa236_NFS_exports [44]
@endService aseqa236
The exclamation points are comment characters. [Return to example]
Identifies the version of ASE installed. [Return to example]
Identifies the condition for which ASE logging is enabled. Values include:
Informational
Notice
Warning
Error
Alert
Identifies the number of members in the ASE [Return to example]
Identifies network retry settings for the primary
network, as defined in the
/etc/hsm.conf
file.
See
Section 1.2.3
for more information on the HSM daemon.
[Return to example]
The number of additional attempts to get a response from a member system before a member is determined to be down. [Return to example]
The amount of time in seconds between attempts to get a response from a member system. [Return to example]
The time in seconds between a successful network or SCSI interconnect ping to a member and the subsequent ping. [Return to example]
The time in seconds between a failed network or SCSI interconnect ping to a member and the next attempt to ping the member. [Return to example]
Identifies network retry settings for the backup
network, as defined in the
/etc/hsm.conf
file.
[Return to example]
Identifies network retry settings for the Availability
Manager (AM) driver, as defined in the
/etc/hsm.conf
file.
See
Section 1.2.4
for more information on
the AM driver.
[Return to example]
Identifies network retry settings for the backup
network, as defined in the
/etc/hsm.conf
file.
[Return to example]
Identifies the format version of the ASE database. [Return to example]
Identifies the product that was used to create the ASE database. [Return to example]
Identifies the ASE member that was used to create the database. [Return to example]
The timestamp for the version of the ASE database. [Return to example]
Identifies when the last update to the database was made. [Return to example]
Identifies the ASE member that was used last to update the database. [Return to example]
Identifies how many times the ASE database has been updated. [Return to example]
Identifies the ASE member name. [Return to example]
Identifies the ASE member's Internet Protocol (IP) address. [Return to example]
Identifies the network path used by the ASE daemons. Values for this field include:
Never
Network is not fully connected to all ASE members.
No
Network was not configured, or administrator requested that it be ignored.
Primary
Primary network.
Backup
Backup network.
Specifies whether ASE will use this network to send pings to members to determine whether they are alive. Values for this field include:
Never
Network is not fully connected to all ASE members.
No
Network was not configured, or administrator requested that it be ignored.
Primary
Primary network.
Backup
Backup network.
Specifies whether ASE will monitor the interface. Values for this field include:
Ignore
Do not monitor.
Monitor
Monitor.
The default error alert script which is called via alert. [Return to example]
Identifies the script the ASE agent uses to invoke the alert script. [Return to example]
Specifies the alert script's timeout value. [Return to example]
Defines the start of a script. [Return to example]
Defines the end of a script. [Return to example]
Start token for service information. [Return to example]
Name of the ASE service being defined. [Return to example]
Type of service. Values include:
DRD
NFS
DISK
USER
TAPE
Specifies whether the service should relocate to a more favorable member when such a member becomes available (for instance, it boots). [Return to example]
Identifies the ASE placement policy. Values include:
balanced
favored
restricted or restricted
Identifies the members on which the service can run (that is, those that have been specified as favored or restricted). [Return to example]
Identifies the DRD device special file corresponding to a DRD service. [Return to example]
Identifies the raw device(s) underlying a DRD service. [Return to example]
End token for service information. [Return to example]
Details on the underlying storage, disk, Advanced File System (AdvFS), and Logical Storage Manager (LSM) for Network File System (NFS) and disk services. [Return to example]
NFS locking file for NFS services. [Return to example]
IP address of disk, tape, or NFS service. [Return to example]
Start token for NFS exports list for NFS services. [Return to example]
List of exported NFS file systems. [Return to example]
End token for NFS exports list for NFS services. [Return to example]
You can use the
asemgr
utility to temporarily stop
a service by placing it off line.
While a service is off line, it is unavailable
to clients.
When you place a Network File System (NFS) service off line, the file systems are automatically unmounted. When you place the service on line to start it, the file systems will be mounted.
When you place off line a service that uses the Logical Storage Manager (LSM), the disk groups are deported. Deporting the disk groups only makes them inaccessible; the disk groups, the volumes, and the data in the volumes are not deleted. When you set the service on line to start it, the disk groups will be imported.
To temporarily stop a service, choose the "Set a service off line" item from the Managing ASE Services menu and choose the service you want to place off line.
If you try to set
a service off line and the service cannot be stopped, the
asemgr
utility displays the following message:
ASE was unable to stop service `disk1`.  Check the syslog's
daemon log to determine why the stop action failed.

Two common reasons for the stop action to fail are:

(1) One of the service's filesets is in use
    (`umount` fails with Device Busy error)

(2) The user-defined stop script returns an error

You can fix the problem now and let ASE try to stop the
service, or you can ignore this failure and let ASE take the
service off line.

Enter 'r' for ASE to RETRY the stop action or 'o' take
the service OFFLINE [r]:
If you choose to retry the stop action by choosing
r
and it is successful, the service is placed off line.
If you retry the stop
action and it is unsuccessful, the
asemgr
utility displays
the previous message again.
If you choose to continue the offline operation by choosing
o, the
asemgr
utility sets the service off line.
You must then manually stop all service processes, unmount the file systems
or filesets, deport any imported LSM disk groups, and set the LSM disks off
line.
If you added a user-defined stop script to the service, you must also
manually perform the steps specified by this script.
You can use the
-d
and
-c
options with the
asemgr
utility to dump the description of an ASE service, including the contents
of any user-defined stop script (see
Section 10.2).
To start a service that has been temporarily stopped, choose the "Set a service on line" item from the Managing ASE Services menu and then choose the service that you want to place on line.
The following list summarizes actions taken by the
asemgr
utility to stop a disk, Network File System (NFS), or shared tape service.
If you must manually stop a service, perform these steps in sequence.
Stop advertising the internet protocol (IP) address, as follows:
/var/ase/sbin/nfs_ifconfig 0 stop
service
The 0 directs errors to the
/var/ase/tmp/ChildLog.0
file.
Undo any Advanced File System (AdvFS) and UNIX File System (UFS) mounts (if applicable), as follows:
/usr/sbin/umount /var/ase/mnt/usr/staff/dsk1
/usr/sbin/umount /var/ase/mnt/usr/staff/dsk4/dsk5
/usr/sbin/umount /var/ase/mnt/usr/staff/dsk4
NFS file systems are mounted under
/var/ase/mnt/....
Hierarchical mount points must be unmounted in reverse order.
Stop AdvFS (if applicable) as follows:
/sbin/rm -rf /etc/fdmns/domain
Stop the Logical Storage Manager (LSM) (if applicable):
/sbin/voldg deport
disk_group
/sbin/voldisk offline
disk1,disk2,disk3...
To stop a distributed raw disk (DRD) service, enter the following command:
/var/ase/sbin/drdmgr 0 stop
service
The 0 directs errors to the
/var/ase/tmp/ChildLog.0
file.
If the status of a service is unassigned, you can manually restart the service. To do this, choose "Restart a service" item from the Managing ASE Services menu and then choose the service you want to restart.
When you restart an unassigned service, the TruCluster software performs the following steps to completely stop the service:
Executes any user-defined stop script for the service.
Removes the Internet Protocol (IP) alias for the service.
Unmounts file systems, tapes, raw disks, or Advanced File Server (AdvFS) filesets used by the service.
Stops Logical Storage Manager (LSM) volumes and deports associated disk groups.
Unreserves disks.
If this sequence completes successfully, the TruCluster software
attempts to start the service.
If any of the steps to stop a service fails,
the TruCluster software does not attempt to start the service, giving you
an opportunity to fix the problem before you manually restart the service.
For example, LSM volumes may be left configured on the system because the
step to deconfigure LSM did not run.
The
asemgr
utility
will tell you that the stop has failed.
Look at the
daemon.log
file to see if the disk groups were deported.
(You can also use LSM tools
from the Cluster Monitor to get this information.) If cleanup is required,
you can do this yourself or use the
asemgr
utility to
place the service off line, which performs cleanup for you.
If the TruCluster software encounters a problem when trying to start
a service after completing the stop sequence, the stop scripts are run again
to try to clean up the problem.
This has the same effect as placing the
service off line, except that the status does not show as off line when you
use the
asemgr
status menu.
When a service restart fails, look in the
daemon.log
file for error messages, which may help you determine why a service was unable
to start.
If possible, fix the problem that prohibited the service from being
started and try again to restart it.
You may need to place the service off
line to get to a state so that the service can be successfully restarted.
Note
If an ASE service becomes unassigned to a member system, you may not be able to use the "Restart a service" item from the Managing ASE Services menu to bring the service back on line after the error has been corrected. To make the service operational, you may need to use the "Set a service off line" and "Set a service on line" items to disable and reenable the service.
You can use the
asemgr
utility to manually relocate
a service.
For example, you may want to relocate a service if the member
system currently providing the service needs maintenance.
When you relocate
a service, the TruCluster software stops the service on the member currently
running the service and starts the service on another member.
When you use the
asemgr
utility to relocate a service,
you can override the service's Automatic Service Placement (ASP) policy,
which may restrict the service to specific members.
See
Chapter 4
for more information on ASP policies.
To relocate a service, follow these steps:
Choose the "Relocate a service" item from the Managing ASE Services menu.
Choose the service you want to relocate.
Choose the member system that you want to run the service.
When you know the name of the service you want to relocate,
you can do it from the command line.
For example, to relocate the service
named
disk1
to member
gideon, enter
the following command:
# asemgr -m disk1 gideon
Example 10-2 shows how to relocate a service using the menu interface.
Select the service you want to relocate:

Services:

    1)  aseba1 on daffy
    2)  aseba2 on gideon
    3)  disk1 on toto

    x)  Exit to Managing ASE Services        ?)  Help

 Enter your choice [x]: 2

Select member to run 'aseba2' service:

    1)  toto
     )  gideon
    3)  daffy

    x)  Exit without making changes      ?)  Help

 Enter your choice: 1

relocating service `aseba2` to member`toto`...
relocation successful...
The "Service Configuration" item of the Managing ASE Services menu of
the
asemgr
utility provides two options that allow you
to change service parameters in the ASE database.
You can make some changes to a service while it remains on line to its clients by selecting the "Modify a service without interrupting its availability" item, and following the instructions in Section 10.6.1. Other changes require minimal interruption of a service's availability to clients. To perform these operations, select the "Modify a service" item, and follow the instructions in Section 10.6.2.
Table 10-1
lists indicates which operations can
be performed from the "Modify a service without interrupting its availability"
menu item.
You can perform all of the operations listed from the
"Modify a service" item, but the
asemgr
utility will put
the service off line while it accomplishes them.
| Operation | "Modify a service without interrupting its availability" | "Modify a service" |
Change the Automatic Service Placement (ASP) policy--See Chapter 4 for information about the ASP policies you can assign to a service. |
Yes |
Yes |
Update the ASE database to reflect
the addition of raw devices ( |
Yes |
Yes |
Update the ASE database to reflect the addition of raw devices to, or the removal of raw devices from, an Advanced File System (AdvFS) domain participating in a disk-based service. |
Yes |
Yes |
Update the ASE database to reflect
the addition of LSM volumes ( |
Yes |
Yes |
Modify the exports file for a Network File System (NFS) service. |
Yes |
Yes |
Add raw devices to, or remove raw devices from, a distributed raw disk (DRD) service. |
Yes |
Yes |
Add LSM volumes ( |
Yes |
Yes |
Add UNIX file systems or AdvFS filesets to a disk-based service. |
No |
Yes |
Change the name of a file system, fileset, or volume participating in a service. |
No |
Yes |
Change the mount point of a service, including its mount options, owner, and mode. |
No |
Yes |
| Change the disk access mode (either read/write or read-only) or quotas. | No |
Yes |
Change a service's name. |
No |
Yes |
Replace, edit, modify, or delete a user-defined action script. |
No |
Yes |
Change the timeout value for a user-defined action script. |
No |
Yes |
DIGITAL recommends using either of these options whenever you change a service's configuration information in the ASE database. Both allow the service to remain on line in its ASE after the modifications are performed expeditiously under ASE control.
You can also modify a service while it is off line to the ASE (for example, if you have set it off line as described in Section 10.3) and outside of the utility's control. However, this method requires more manual intervention, is most disruptive to service availability, and is prone to error, especially in complex storage configurations.
Notes
Carefully read Section 10.6.3 before modifying AdvFS or LSM configuration information for a service that you have set off line. This section also describes restrictions to the use of AdvFS, LSM, and DIGITAL UNIX disk management commands in an ASE.
If you modify an NFS service in an ASE, your first attempt to access the service may cause a
stale file handlemessage to be displayedAfter you modify the exports file of an NFS service, clients may receive
stale file handlemessages and be unable to mount NFS file systems associated with the service. If this problem occurs, send theSIGHUPsignal to themountdprocess on the ASE member that is running the service.
For those changes to a service that do not require a disruption in service availability (as described in Table 10-1), follow these steps:
Run the
asemgr
utility on the member system
on which the service is currently running.
Choose the "Modify a service without interrupting its availability" item from the Service Configuration menu and then choose the service that you want to modify:
 Service Configuration

   a)  Add a new service
   m)  Modify a service
   o)  Modify a service without interrupting its availability
   d)  Delete a service
   s)  Display the status of a service

   x)  Exit to Managing ASE Services    ?)  Help

Enter your choice [x]: o

 Online Service Modification

Select the service you want to modify:

   1)  ase1 on fgreg1
   2)  greg on fgreg2
   3)  drd1 on fgreg2

   x)  Exit to Service Configuration

Enter your choice [x]: 2
The
asemgr
utility displays a list of modifications that can be performed
without disrupting the selected online service.
For example, choose option
a
to modify the Automatic
Service Placement (ASP) policy:
Select what you want to modify in service `greg`:

    a)  Automatic service placement (ASP) policy
    u)  Update with storage configuration changes (LSM and AdvFS only)

    x)  Exit without modifications

Enter your choice [x]: a
At this point, proceed to specify a new ASP policy in the same manner as when adding a new service. For more information on specifying an ASP policy, see Chapter 4.
Example 10-3
shows how to update disk configuration
information for an online AdvFS service.
In this example, the administrator
added a new volume to an AdvFS domain and runs the
asemgr
utility to modify the service (ase1) that uses this domain.
The
asemgr
utility checks the AdvFS configuration information
and updates the ASE database while service
ase1
continues
to run without interruption.
		Service Configuration

    a)  Add a new service
    m)  Modify a service
    o)  Modify a service without interrupting its availability
    d)  Delete a service
    s)  Display the status of a service

    x)  Exit to Managing ASE Services    ?)  Help

Enter your choice [x]: o

	Online Service Modification

Select the service you want to modify:

    1)  ase1 on fgreg1
    2)  greg on fgreg2
    3)  drd1 on fgreg2

    x)  Exit to Service Configuration

Enter your choice [x]: 1

Select what you want to modify in service `ase1`:

    a)  Automatic service placement (ASP) policy
    u)  Update with storage configuration changes (LSM and AdvFS only)

    x)  Exit without modifications

Enter your choice [x]: u

Checking AdvFS domain val ...

AdvFS domain `val` shows a change in the volumes configured:

Old volume list:
	/dev/rz20b

New volume list:
	/dev/rz16b
	/dev/rz20b

Is this correct (y/n) [y]: y
Enter 'y' to modify service 'ase1' (y/n): y
Service successfully updated.
If the service cannot be started with the new storage configuration information, the service is placed off line. You are then given the opportunity to correct the problem or to discard the configuration modifications.
For those changes to a service that require a slight disruption in service
availability (as described in
Table 10-1), select the
"Modify a service" item from the Service Configuration menu of the
asemgr
utility.
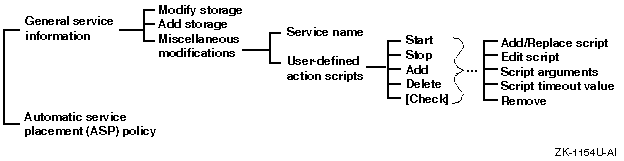
Figure 10-1
shows a map of the
asemgr
utility's Modifying a Service menu.
When you select the "Modify a service" item from the Service Configuration
menu of the
asemgr
utility, the TruCluster software automatically
performs the following tasks:
Stops the service on the member system.
Deletes the service from all the members.
Adds the service to the ASE database.
Starts the modified service on a member.
Propagates the database changes to all the members.
If you try to modify a service
and the service cannot be stopped, the
asemgr
utility
displays the following message:
ASE was unable to stop service `disk`.  Check the syslog's
daemon log to determine why the stop action failed.

Two common reasons for the stop action to fail are:

(1) one of the service's filesets is in use
    (`umount` fails with Device Busy error), or

(2) the user-defined stop script returns an error.

You can fix the problem now and let ASE try again to stop the
service or you can let ASE take the service OFFLINE so you can
stop the service manually.  If you choose to stop the service
manually and cannot stop it completely, you will need to reboot
the system to avoid a system panic or data corruption.

If the stop action failed because one of the service's filesets
is in use, you should try to kill the processes that are using
the fileset and let ASE try again to stop the service.  If ASE
is unable to stop the service, you should let ASE take the
service offline.  If the stop action failed because the
user-defined stop script returned an error, you should let ASE
continue with the modify operation.


Enter 'r' for ASE to RETRY the stop action or 'm' for you to
MANUALLY stop the service [r]:
If you retry the stop action and it is successful, the service is modified.
If you retry the stop action and it is unsuccessful, the
asemgr
utility displays the previous message again.
If you continue the stop operation without fixing the problem, the
asemgr
utility displays the following message:
You must manually stop all service processes, unmount any mounted
filesets, deport any imported LSM disk groups, and set the LSM
disks offline.

Failure to stop the service could cause the system to panic when
the service is restarted.  If you cannot stop the service, you
should reboot the member running the service.

 Press 'Return' to continue: [Return]

You can now exit the modify operation or continue with
the modify.  If you continue with the modify, the old service
will be deleted and then the new service will be added.  Once the
old service is deleted, if the ASE cannot add the new service or
restore the old service, the service will remain deleted.

Enter 'x' to exit the modify operation or 'c' to continue [x]:
The
asemgr
utility allows you to either continue
to modify the service or to exit the operation.
If you choose to exit the
operation, the service is placed off line, and the
asemgr
utility returns to the Service Configuration menu.
If you continue with the
modification, the original service is deleted and the new service is added
and then started, if possible.
If a modified service cannot be added to the ASE, the
asemgr
utility displays the following message:
Add failed - Unable to add service.
Check syslog's daemon log to determine the error.

Enter 'o' to restore the old service configuration, 'n' to retry
the new service configuration, or 'd' to delete the service [n]:
For example, the mount point specified in an NFS service may not have been created on the system. You can create the mount point, then type n to retry.
If you retry the service modification and it succeeds, the modification
proceeds.
It the retry fails, the
asemgr
utility displays
the previous message.
If you successfully restore the original service, it remains configured
but is placed off line.
If the original service cannot be restored, the
asemgr
utility displays the previous message.
If you cannot successfully restore the original service or modify the service, you can delete the service. See Section 10.7 for information about deleting services.
Example 10-4 shows how to modify an NFS service by adding a new area to be exported, and by editing the ASE exports file to restrict the service to two clients.
 # asemgr

.
.
.
Modifying a Service

Select the service you want to modify:


    1)  ase3
    2)  aseba2

    x)  Exit                             ?)  Help


 Enter your choice [x]: 1

Select what you want to modify in service `ase3`:

    g)  General service information
    r)  Automatic service placement (ASP) policy

    x)  Exit without modifications           ?)  Help

 Enter your choice [g]: g

                 NFS Service Modification

The following menu lists the disk storage configuration for
the service "ase3."

You can modify the following storage configurations, add more storage,
or perform miscellaneous modifications (for example, modify the
exports file).

Select what to modify in the NFS service `ase3`:

    1)  /dev/vol/dg3/vol03      (UFS)
    2)  dom1#fset1     (ADVFS)
    a)  Add a UFS file system, AdvFS fileset, or LSM volume
    m)  Miscellaneous modifications for `ase3`
    q)  Quit without making any changes
    x)  Exit (done with modifications)

 Enter your choice [x]: a

                   Specifying Disk Information

Enter one or more UFS device special files, AdvFS filesets, or LSM
volumes to define the disk storage for this service.

    For example:        Device special file:      /dev/rz3c
                        AdvFS fileset:            domain1#set1
                        LSM volume:               /dev/vol/dg1/vol01

To end the list, press the Return key at the prompt.

Enter a device special file, an AdvFS fileset, or an LSM volume as
 storage for this service (press 'Return' to end): /dev/rz28c

Enter the directory pathname(s) to be NFS exported from the storage
area "/dev/rz28c".  Press 'Return' when done.

 Enter a directory pathname: /usr/staff

  Enter a host name, NIS netgroup, or IP address for the NFS
   exports list (press 'Return' for all hosts): staff_group

Enter a directory pathname:[Return]

              UFS File System Read-Write Access
Mount `/dev/rz28c` file system with read-write or read-only access?

    1)  Read-write
    2)  Read-only

 Enter your choice [1]: 2

              UFS Mount Options Modification

Enter a comma-separated list of any mount options you want to use for
`/dev/rz28c` (in addition to the UFS-specific defaults listed
in the mount.8 reference page).  If none are given, only the default
mount options are used.

 Enter options (Return for none):[Return]

Enter a device special file, an AdvFS fileset, or an LSM volume as
 storage for this service (press 'Return' to end): [Return]

Select what to modify in the NFS service `ase3`:

    1)  /dev/vol/dg3/vol03      (UFS)
    2)  dom1#fset1     (ADVFS)
    a)  Add a UFS file system, AdvFS fileset, or LSM volume
    m)  Miscellaneous modifications for `ase3`
    q)  Quit without making any changes
    x)  Exit (done with modifications)

 Enter your choice [x]: m

Miscellaneous modifications for service `ase3`:

    e)  Export file input for `ase3`
    n)  Service name [ase3]
    s)  NFS file system area [dom1#fset1]
    u)  User-defined action scripts
    x)  Exit to previous menu


 Enter your choice [x]: x

Select what to modify in the NFS service `ase3`:

    1)  /dev/vol/dg3/vol03      (UFS)
    2)  dom1#fset1     (ADVFS)
    a)  Add a UFS file system, AdvFS fileset, or LSM volume
    m)  Miscellaneous modifications for `ase3`
    q)  Quit without making any changes
    x)  Exit (done with modifications)

 Enter your choice [x]: x

 Enter 'y' to modify Service 'ase3' (y/n): y

Stopping service...
Deleting service...
Adding service...
Starting service...
Saving the updated database...
Service successfully updated...
Managing storage in an ASE requires a detailed understanding of the TruCluster software and storage subsystem operation.
This section provides information about managing AdvFS and LSM subsystems, replacing a failed disk, and using DIGITAL UNIX storage management commands.
Before you set up a service, you must have configured the disks that
you will use in the service.
For example, you must have set up your file
systems, AdvFS filesets, and LSM volumes.
When you run the
asemgr
utility to add a service, you specify information about the disk
configuration at the prompts.
This information is included in the ASE database
on each member system.
However, after a disk is used in an ASE service, you must use special procedures to manage the disk. This is because the ASE must always maintain control of the disk while a service is running. For example, you do not manually unmount a file system that is being used by an online ASE service.
As discussed in
Section 10.6, the TruCluster software
allows you to modify an ASE service and change its storage configuration.
The "Service Configuration" item of the Managing ASE Services menu of the
asemgr
utility provides two options that allow you to change service
parameters while the service remains on line within its ASE and under ASE
control.
You can modify any of the information that was specified when the
service was added to the ASE.
Although most common changes (such as adding
a disk to an AdvFS domain or an LSM volume) can be made to a service without
disrupting its availability to clients, others (such as changing disk attributes)
can be made only with a slight disruption to its availability.
Table 10-1
indicates which modifications require a disruption of service availability.
DIGITAL recommends using either of these options whenever you change a service's configuration information in the ASE database. Both allow the service to remain on line in its ASE while the modifications are performed expeditiously under ASE control. You can also modify a service while it is off line to the ASE and outside of the utility's control. However, this method requires more manual intervention, is most disruptive to service availability, and is prone to error, especially in complex storage configurations. Carefully read Section 10.6.3 before modifying AdvFS or LSM configuration information for a service that you have set off line. This section also describes restrictions on the use of AdvFS, LSM, and DIGITAL UNIX disk management commands in an ASE.
If you make modifications that affect a service's AdvFS or LSM storage configuration and you want to modify the service while it is off line to the ASE, you must set the service off line as described in Section 10.3 and follow the special procedures described in the following sections. These procedures ensure that the ASE recognizes and incorporates the configuration changes, and that the ASE database is consistent with any AdvFS and LSM subsystem databases.
The AdvFS and the LSM subsystems utilize databases that contain records of the subsystems' disk configuration. AdvFS and LSM subsystems consist of a disk organization built on top of physical disks. For example:
In an AdvFS subsystem, a file domain contains one or more physical disks (volumes) and is used as a shared storage pool for one or more filesets.
In an LSM subsystem, a disk group is a collection of physical disks and is used as a shared storage pool for LSM volumes. You can create file systems or AdvFS domains and filesets on top of LSM volumes.
Before you add an ASE service, you must set up the storage configuration
for the service.
When you create the service, the
asemgr
utility prompts you for information about the storage configuration, including
physical disks, UNIX file systems, AdvFS filesets and domains, LSM volumes,
and mount points.
This information is included in the ASE database file on
each member system and is used to configure, start, and stop the ASE service.
For proper ASE operation, the information in the ASE database must be consistent with any AdvFS or LSM configuration database. If you modify a service's AdvFS or LSM configuration and those modifications cause the subsystem database to change, you must be sure to incorporate those changes into the ASE database.
If you modify a service that has been placed off line, the service will be unavailable during the entire service modification procedure.
To modify an AdvFS or LSM storage configuration used in a service, you must follow special procedures:
If you are modifying a service on line, make the modifications on the member system running the service and make sure that the service does not relocate. (See Section 10.6 for instructions.)
If you are modifying a service off line, make the modifications on the member system on which the disks are configured or imported.
Regardless of whether you are modifying an online or an offline service, some AdvFS and LSM storage modifications require you to update the ASE database with the storage configuration changes. You also must adhere to the AdvFS and LSM command restrictions listed in Section 10.6.3.4 and Section 10.6.3.5.
To modify the storage configuration for a service that has been placed off line, follow these steps:
Optionally, run the
asemgr
utility to display
the status of the service you want to modify and the storage configuration
for the service.
Run the
asemgr
utility and set the service
off line.
If you are modifying an LSM storage configuration or an AdvFS configuration on top of an LSM volume, perform the following tasks on the member system on which you will modify the LSM configuration:
Place on line the disks used in the disk group you want to modify, using the following command syntax:
voldisk online
disk .
.
.
Import the disk group, using the following command syntax:
voldg import
disk_group
Restart the volumes, using the following command syntax:
volrecover -sb
disk_group
If you are modifying an AdvFS storage configuration, perform the following tasks:
On the member system on which you will modify the AdvFS configuration, re-create the domain directory, using the following command syntax:
mkdir -p /etc/fdmns/
domain_name
Change your directory to the domain directory, using the following command syntax:
cd /etc/fdmns/
domain_name
Re-create the device links, using the following command syntax for all the volumes in the domain:
ln -s
device
The
device
variable can be a UNIX
file system or an LSM volume (for example,
/dev/rz20c
or
/dev/vol/dg3/vol04).
Modify the AdvFS or LSM storage configuration. See Section 10.6.3.4, Section 10.6.3.5, and Section 10.6.3.6 for restrictions on using AdvFS, LSM, and DIGITAL UNIX disk management commands in an ASE.
If you modified the LSM storage configuration, deport the disk group and take its disks off line. Use the following command syntax:
voldg deport
disk_group
voldisk offline
disk .
.
.
If you modified the AdvFS storage configuration, remove the domain directory that you created, using the following command syntax:
rm -rf /etc/fdmns/domain_name
If necessary, update the ASE database by running the
asemgr
utility.
Select the "Modify a service" or "Modify a service
online" item, as appropriate, from the Service Configuration menu, specify
the name of the service, and then select the "General service information"
menu item.
Choose the menu item that corresponds to the storage modification you made. For example:
  Select what to modify in the NFS service `ase3`:

    1)  /dev/vol/dg3/vol03      (UFS)
    2)  dom1#fset1     (ADVFS)
    a)  Add a UFS file system, AdvFS fileset, or LSM volume
    m)  Miscellaneous modifications for `ase3`
    q)  Quit without making any changes
    x)  Exit (done with modifications)
In the previous example:
Choose
1
if you changed the LSM configuration
(for example, if you added disks to disk group
dg3).
Choose
2
if you changed the AdvFS configuration
(for example, if you added a volume to domain
dom1).
Choose
a
if you changed the storage configuration
and you also want to add a new file system, AdvFS fileset, or LSM volume
to the service.
After you choose a menu item, another menu is displayed, depending on your previous choice. Select the menu item that corresponds to the storage modifications you made.
If you chose the
/dev/vol/dg3/vol03
item from the
previous menu, the following menu might be displayed:
Modify/Delete file system `/dev/vol/dg3/vol03`:

    m)  Modify UFS file system information
    n)  Change file system device special file
           [/dev/vol/dg3/vol03]
    e)  Modify the exports list
     )  Modify AdvFS domain information
    d)  Delete `/dev/vol/dg3/vol03`
    x)  Exit - done with changes
After you choose the appropriate menu item, information about the modified configuration is displayed, and you are prompted to confirm that the information is correct.
If you chose item
m
in the previous example, the
following information might be displayed:
LSM physical list does not match with what LSM thinks

        New list: rz10g rz11g
        Old list: rz10g

 Following is a list of devices and pubpath for disk group dg3

        DEVICE  PUBPATH

        rz10g   /dev/rz10g
        rz11g   /dev/rz11g

Is this correct (y/n) [y]:
When you enter
y, the
TruCluster software updates the ASE database with the new storage configuration
on all the member systems.
Run the
asemgr
utility and place the service
on line.
If you are unable to restart the service because of an error, the
service remains off line, giving you the opportunity to correct the problem.
The following list contains AdvFS commands that have restrictions when used in an ASE or that require you to update the ASE database:
addvol
To add a volume to a domain, use the
addvol
command.
Then, run the
asemgr
utility and use the
o
option on the Service Configuration menu to update the ASE database.
balance
Before you can balance volumes in a file domain, all filesets in the
file domain must be mounted.
If there are filesets in the domain that the
ASE service does not mount, you must use the
asemgr
utility
to modify the service so that the filesets are mounted.
Unless the service
is off line, do not manually mount the filesets.
defragment
Before you can defragment a file domain, all filesets in the file domain
must be mounted.
If there are filesets in the domain that the ASE service
does not mount, you must use the
asemgr
utility to modify
the service so that the filesets are mounted.
Unless the service is off line,
you cannot manually mount the filesets.
dxadvfs
There are no restrictions on running the
dxadvfs
command to display information.
However, if you are using the graphical maintenance
utilities, you must adhere to the restrictions for the equivalent command-line
operations.
mkfdmn
If one partition of a volume is assigned to an ASE service, the other partitions must be assigned to the same service or remain unused. This is because only one ASE service can use a disk.
mkfset
If one fileset in a domain is assigned to an ASE service, the other
filesets must be assigned to the same service or remain unused.
This is because
only one ASE service can use a disk.
Do not include any of the filesets in
a domain that is used in an ASE service in the
/etc/fstab
file.
Loopback NFS-mounting of the filesets exported by an ASE service is
supported.
renamefset
To rename a fileset that is used in an ASE service, use the
renamefset
command.
Then, run the
asemgr
utility
to place the service off line, and update the ASE database by using the
m
option on the Service Configuration menu.
rmfdmn
To remove a domain belonging to an ASE service, use the
asemgr
utility to modify the service and remove all of the domain's filesets.
If there are dependencies between the filesets' mount points, remove the
filesets in the order that they would unmounted.
Then, invoke the
rmfdmn
command.
rmfset
To remove a fileset belonging to an ASE service, use the
asemgr
utility to modify the service and delete the fileset from the service.
Then, use the
rmfset
command to remove the fileset from
the domain.
rmvol
If the domain contains filesets that the ASE service does not mount, you must modify the service to mount them, or place the service off line and then manually mount the filesets. Do not manually mount the filesets while the service is on line.
To remove a volume from a domain, use the
rmvol
command.
Then, run the
asemgr
utility and use the
o
option on the Service Configuration menu to update the ASE database.
vquotacheck
The TruCluster software runs the
vquotacheck
command
when it starts a service.
If there is activity on a fileset used in the service,
the
vquotacheck
command may fail and the
vquotaon
command will not run.
If the
vquotacheck
command
fails, you can manually invoke the command.
vncheck
To run the
vncheck
command on filesets used in an
ASE service, you must put the service off line.
Save a copy of the
/etc/fstab
file and add the filesets to the file.
Then, invoke
the
vncheck
command.
After you run the command, you can
restore the original
/etc/fstab
file and place the service
on line.
vquotaqon
The TruCluster software runs the
vquotaon
command
when it starts a service if the
vquotacheck
command exits
with zero status.
If necessary, you can manually invoke the
vquotaon
command after the service is started.
The following list contains the AdvFS commands that have no restrictions when used in an ASE, and do not require you to update the ASE database:
chfile
chfsets
chvol
clonefset
migrate
mktrashcan
rmtrashcan
showfdmn
showfsets
shtrashcan
stripe
vdump
vedquota
vquot
vquota
vquotaoff
vrepquota
vrestore
The following list contains the LSM commands that have restrictions when used in an ASE, or that require you to update the ASE database:
dxlsm
There are no restrictions on running the
dxlsm
command
to display information.
However, if you are using the graphical maintenance
utilities, you must adhere to the restrictions that apply to the equivalent
command-line operations.
voladvdomencap
See the restrictions for the
volencap
command.
volassist
If you use the
make
keyword, all volumes in a disk
group must belong to one service and cannot be used outside of the ASE.
There
are no restrictions for the
mirror,
move,
grow,
shrink, or
snap
keywords.
vold
The TruCluster software requires that the LSM configuration daemon,
vold, is running and stabilized.
In addition, you cannot fail over
or relocate an ASE service that uses LSM if a
vold
is
either initializing or not running.
voldctl
Do not use the
hostid
keyword on an ASE member system,
unless you stop the TruCluster software on that system.
You can do one of
the following tasks:
Delete the member system from the ASE, run the
voldctl
command with the
hostid
keyword, and then add
the system to the ASE.
Shut down the system to single-user mode, run the
voldctl
command with the
hostid
keyword, and
then boot to multiuser mode.
Invoke the
/sbin/init.d/asemember stop
script, run the
voldctl
command with the
hostid
keyword, and then invoke the
/sbin/init.d asemember start
script.
If you use the
add disk
keyword, do not add a disk that is used by another ASE service.
Do not use the
disable
keyword to disable the
vold
daemon on a member system if any service in the ASE uses LSM.
Do not use the
stop
option to stop the
vold
daemon on a member system if any service in the ASE uses LSM.
There are no restrictions for the
init,
rm disk,
list,
enable, and
mode
keywords.
voldg
If you use the
import
keyword, do not import a disk
group that belongs to an online ASE service.
If you use the
deport
keyword, do not deport a disk
group that belongs to an online ASE service.
If you use the
flush
keyword, do not flush a disk
group belonging to an online ASE service.
Before you add disks to a disk group, you must use the
voldisksetup
command to initialize the disks.
Use the
voldg adddisk
command (or the
voldiskadd
command) to add the
disks.
Then, run the
asemgr
utility and choose the
o
option on the Service Configuration menu to update the ASE database.
To remove disks from a disk group, use the
voldg rmdisk
command, then run the
asemgr
utility and choose the
o
option on the Service Configuration menu to update the ASE database.
There are no restrictions for the
init,
list, and
free
keywords.
voldisk
If you use the
init
keyword, do not initialize a
disk if any of its partitions are used in an ASE service.
Do not use the
rm
keyword to remove a disk that is
used in an online ASE service.
Do not use the
clearimport
keyword on a disk that
is used in an online ASE service.
There are no restrictions for the
define,
moddb,
offline,
online, or
list
keywords.
voldiskadd
Use the
voldiskadd
command to add the disks.
Then,
run the
asemgr
utility and choose the
o
option on the Service Configuration menu to update the ASE database.
voldiskadm
This utility provides an interactive interface for other LSM utilities.
See the restrictions for the
voldg
and
voldisk
commands.
voledit
To remove a volume record from a disk group used in an ASE service,
run the
asemgr
utility and delete the volume from the
service, and then use the
voledit rm
command to remove
the record.
To rename a volume assigned to an ASE service, run the
voledit
command to rename the volume, and then run the
asemgr
utility to modify the service, choosing the "Change the device
special file" menu item.
There are no restrictions for the
set
and
cc
keywords.
volencap
To encapsulate a disk partition and add it to a service's LSM configuration,
use the
asemgr
utility to delete the affected storage
from the ASE service.
Invoke the
volencap
or the
vol-reconfig
command to encapsulate the storage.
If necessary, reboot
the system.
Then, modify the ASE service to add the LSM volume or volumes
to the service.
volmend
Do not use the
volmend
command on storage used in
an online ASE service.
volplex
If you want to use the
dis
keyword, see the restrictions
for the
volassist make
command and the
mount
command.
There are no restrictions for the
att,
det,
cp,
snap, and
mv
keywords.
vol-reconfig
See the restrictions for the
volencap
command.
volsetup
Do not include any ASE shared storage devices in the
rootdg
disk group.
volstartup
See the restrictions for the
vold
command.
volume
If you use the
init
keyword, do not initialize a
volume that is used in an online ASE service.
If you use the
stop
or
stopall
keywords, do not stop a volume that is used in an online ASE service.
Do not use the
maint
keyword on a volume that is
used in an online ASE service.
There are no restrictions for the
rdpol,
start,
startall,
resync,
and
set
keywords.
The following list contains the LSM commands that have no restrictions when used in an ASE, and do not require you to update the ASE database:
volinfo
voliod
volinstall
volnotify
volprint
volrecover
volsd
volstat
voltrace
volwatch
The following commands have restrictions when used in an ASE:
Disk quota management commands and utilities
The disk quota utilities require entries in the
/etc/fstab
file.
However, you must not edit the
/etc/fstab
in an ASE.
Instead, use the
asemgr
utility to enable quota
enforcement on file systems and filesets used in an ASE service.
mount
Do not manually mount a file system or fileset used in an ASE service unless the service is off line.
scu
There are no restrictions on the
show device,
show inquiry, or
show path-inquiry
commands.
However, DIGITAL does not support any other
scu
commands
with a bus or device that is used in an online ASE service, unless you are
authorized to run the commands by the Customer Support Center (CSC).
umount
Do not manually unmount a file system or fileset that is used in an ASE service unless the service is off line.
The following sections describe how to replace a failed disk. See your hardware configuration and software installation manuals for information about installing disks in storage units.
If a disk that is not part of an LSM mirrored volume fails, the service that is using the disk will stop. To replace a disk, follow these steps:
Pull the failed disk from its slot and replace it with a disk that has the same unit number as the failed disk.
If the disk is part of an LSM disk group, use the
asemgr
utility to rereserve the service's disks.
Restore the data from a backup.
Start the service.
If you are using LSM, you can replace a failed disk with a disk that has a different unit number. To do this, you must have a spare disk that is part of the same LSM disk group as the failed disk. Having the spare disk available ensures that the list of physical disks in the disk group does not change, and you do not have to update the ASE database. However, you must keep the failed disk in its disk slot until you are ready to replace it with a viable disk. This replacement disk can now be used as the spare disk in the disk group.
You can replace a failed disk that is part of an LSM mirrored volume without interrupting the availability of the service. To do this, follow these steps:
Follow the procedure in the DIGITAL UNIX Logical Storage Manager manual for replacing a disk with the same unit number. However, while the failed disk is removed from the disk group, the service cannot be failed over.
Run the
asemgr
utility and rereserve the
service's disks.
Use the
volrecover
command to recover the
disk data.
You can replace a failed disk with a disk that has a different unit number without interrupting the availability of the service. To do this, you must have a spare disk that is part of the same disk group as the failed disk. Having the spare disk available ensures that the list of physical disks in the disk group does not change, and you do not have to update the ASE database. However, you must keep the failed disk in its disk slot until you are ready to replace it with a viable disk. This replacement disk can now be used as the spare disk in the disk group.
You use the
asemgr
utility
to delete a service.
When you delete a service, the TruCluster software
stops the service on the member system, deletes the service from all the
members, removes the service information from the database, and propagates
the database changes to all the members.
If you delete or stop a service that uses Logical Storage Manager (LSM),
the disk group is deported.
Deporting the disk group only makes it inaccessible;
the disk group, the volumes, and the data in the volumes are not deleted.
In addition, if you delete or stop a service that uses Advanced File System
(AdvFS), the domain is no longer configured.
Because of this, when you delete
a service that uses either LSM or AdvFS, the
asemgr
utility
prompts you for a member on which to leave the LSM disk group imported or
AdvFS domain configured, so you can use it for other purposes.
To delete a service, choose the "Delete a service" item from the Service Configuration menu and then choose the service you want to delete. If the service uses AdvFS or LSM, you are prompted for a member on which to keep the disks configured.
Example 10-5 shows how to delete a service.
 # asemgr


.
.
.
Service Configuration

    a)  Add a service
    m)  Modify a service
    d)  Delete a service
    s)  Display the status of a service

    x)  Back to Managing ASE Services menu   ?)  Help

 Enter your choice [x]: d

Select the service you want to delete:

    1)  aseba1 on daffy
    2)  aseba2 on gideon
    3)  disk1 on toto

    x)  Exit to Service Configuration     ?)  Help

 Enter your choice [x]: 2

This service uses either an AdvFS or an LSM storage configuration.
You must select a member on which to leave the storage configured:

    1)  toto
    2)  gideon
    3)  daffy

    x)  Exit to Service Configuration      ?)  Help

 Enter your choice [1]: 2

Member to leave the storage configuration on: gideon

 Is this correct (y/n) [y]: y

 Enter 'y' to delete Service 'aseba2' (y/n): y

Stopping service...
Deleting service...
Saving the updated database...
Service successfully removed...
If you try to delete
a service and the service cannot be stopped, the
asemgr
utility displays the following message:
ASE was unable to stop service `service`.  Check the syslog's
daemon log to determine why the stop action failed.

Two common reasons for the stop action to fail are:

(1) One of the service's filesets is in use
    (`umount` fails with Device Busy error)

(2) The user-defined stop script returns an error

You can fix the problem now and let ASE try to stop the service,
or you can ignore this failure and let ASE continue with the
delete operation.

Enter 'r' for ASE to RETRY the stop action or 'c' to CONTINUE
with the delete operation [r]:
If you retry the stop action and it is successful, the service is deleted.
If you retry the stop action and it is unsuccessful, the
asemgr
utility displays the previous message again.
If you continue the delete operation, the
asemgr
utility displays the following message:
You must manually stop all service processes, unmount any
mounted filesets, deport any imported LSM disk groups, and
set the LSM disks off line.

Failure to stop the service could cause the system to panic
when the service is restarted.  If you cannot stop the service,
you should reboot the member running the service.

Press 'Return' to continue:
When you press the Return key, the
asemgr
utility
deletes the service.
You must then manually stop all service processes,
unmount any mounted file systems or filesets, deport any imported LSM disk
groups, and set the LSM disks off line.
You can then use the disks in another
service or for some other purpose.
When a failed or previously unavailable
part of a Logical Storage Manager (LSM) mirrored volume becomes available
again, you can reincorporate the device into the service without interrupting
the service.
To do this, resynchronize the mirrored volume outside of the
available server environment (ASE) on the member to which the disk groups
are imported.
Then, rereserve the devices by using the
asemgr
utility's Advanced Utilities menu.